
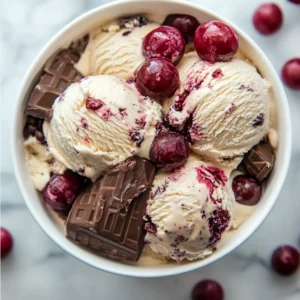
The first time I made Cherry Garcia Ice Cream at home, I was convinced I’d never need to buy the famous pint again. There’s something magical about the combination of sweet-tart cherries folded into creamy vanilla ice cream with generous chunks of dark chocolate scattered throughout. This Cherry Garcia Ice Cream recipe delivers all the nostalgic flavor you love but with the satisfaction of creating it yourself. The cherries retain their perfect juicy bite, the chocolate shatters pleasantly with each spoonful, and the vanilla base is richer than anything you’ll find in stores. Keep reading to discover how easily you can recreate this iconic flavor in your own kitchen, with or without an ice cream maker!
Why You’ll Love This Cherry Garcia Ice Cream
Making Cherry Garcia Ice Cream at home solves the common disappointment of store-bought versions that skimp on the mix-ins or use artificial flavors. When I first served this to my ice cream-obsessed brother-in-law (who claims to be a Cherry Garcia connoisseur), he was silent for the first few bites before declaring it “dangerously better than the original.” That’s when I knew this recipe was special.
What makes this Cherry Garcia Ice Cream recipe truly exceptional is its adaptability. Don’t have fresh cherries? Frozen work beautifully. Prefer white chocolate over dark? The swap is simple. Want a non-dairy version? I’ll show you my tested substitutions that don’t sacrifice creaminess. The recipe even works without an ice cream maker, though I’ll share techniques for both methods.
As summer approaches, having this Cherry Garcia Ice Cream recipe in your repertoire means you’re always ready to transform ordinary gatherings into memorable occasions. Let’s dive into exactly how to make this crowd-pleasing frozen treat.
Ingredients for Perfect Cherry Garcia Ice Cream
For the Ice Cream Base:
- 2 cups heavy cream – The fat content here is crucial for achieving that silky texture; don’t substitute with half-and-half or milk
- 1 cup whole milk – Provides the perfect balance of richness without becoming too heavy; 2% milk works in a pinch but reduces creaminess
- 3/4 cup granulated sugar – Regular white sugar dissolves best, though organic cane sugar adds a subtle depth of flavor
- 1/4 cup honey – My secret ingredient that prevents ice crystals and adds complexity; maple syrup works beautifully as an alternative
- 5 large egg yolks – These create that custard-like richness; for eggless versions, see the variations section
- 2 teaspoons vanilla extract – Pure extract makes a noticeable difference; vanilla bean paste is even better if available
- 1/4 teaspoon almond extract – Optional but enhances the cherry flavor dramatically
- 1/4 teaspoon salt – Balances sweetness and amplifies all flavors; don’t skip this!
For the Cherry Chocolate Mix-ins:
- 1 1/2 cups fresh cherries, pitted and halved – Sweet cherries are traditional, but sour cherries create an amazing contrast if you increase the sugar slightly
- 2 tablespoons cherry liqueur or kirsch – Optional but enhances cherry flavor; cherry juice concentrate works for alcohol-free versions
- 1 tablespoon lemon juice – Brightens the cherry flavor and prevents oxidation
- 6 ounces dark chocolate, roughly chopped – 70% cocoa content offers the perfect balance; chop by hand for rustic chunks rather than using chips
- 1 tablespoon coconut oil – Mixed with melted chocolate creates the perfect “snap” when frozen
How to Make Cherry Garcia Ice Cream
Step 1: Prepare the Cherries
- Wash, pit, and halve the cherries. Place them in a bowl with lemon juice and cherry liqueur (if using).
- Gently macerate the cherries by sprinkling with 2 tablespoons of the sugar. Let sit for 30 minutes until they release their juices. The cherries will take on a glossy appearance and create a light syrup.
- Drain the cherry juice into a separate container (we’ll use this later!) and refrigerate both the cherries and juice.
Step 2: Create the Ice Cream Base
- In a medium saucepan, combine the milk, heavy cream, and half of the remaining sugar. Heat over medium-low until steaming but not boiling. You’ll know it’s ready when tiny bubbles form around the edges and the surface shivers slightly.
- Meanwhile, in a heat-safe bowl, whisk together the egg yolks with the remaining sugar and honey until the mixture lightens in color and becomes slightly fluffy, about 2 minutes of vigorous whisking.
- Temper the eggs by slowly pouring about 1 cup of the hot cream mixture into the egg mixture while constantly whisking. This gradual warming prevents the eggs from scrambling.
- Pour the tempered egg mixture back into the saucepan with the remaining cream mixture, stirring constantly.
- Cook over medium-low heat, stirring continuously with a wooden spoon or heat-resistant spatula, until the mixture thickens enough to coat the back of the spoon. When you run your finger through the coating, it should leave a clear path. This usually takes 5-7 minutes. Do not let it boil!
- Remove from heat and strain through a fine-mesh sieve into a clean bowl to remove any accidentally cooked egg bits.
- Stir in the vanilla extract, almond extract (if using), salt, and the reserved cherry juice from step 1.
- Cover the surface directly with plastic wrap to prevent a skin from forming, and refrigerate for at least 4 hours or overnight. The base should be completely cold before churning.
Step 3: Prepare the Chocolate
- Melt half of the chocolate with the coconut oil in a microwave-safe bowl in 30-second intervals, stirring between each, until just melted.
- Spread the melted chocolate in a thin layer on a parchment-lined baking sheet and freeze for 15 minutes.
- Break the frozen chocolate sheet into small, irregular pieces. These will be your chocolate “flakes.”
- Keep the remaining chocolate chunked for a different texture experience. Store both chocolate preparations in the refrigerator until needed.
Step 4: Churn the Ice Cream
If using an ice cream maker:
- Pour the chilled base into your ice cream maker and churn according to manufacturer’s instructions, usually 20-25 minutes or until the mixture resembles soft-serve.
- During the last 2 minutes of churning, add the macerated cherries (drained of any additional liquid) and both chocolate preparations.
If making without an ice cream machine:
- Pour the chilled base into a shallow, freezer-safe container.
- Freeze for 30 minutes, then remove and vigorously whisk to break up ice crystals.
- Return to freezer and repeat this process every 30 minutes for 2-3 hours.
- When the mixture is semi-frozen but still mixable, fold in the cherries and chocolate by hand.
Step 5: Final Freezing
- Transfer the churned ice cream to a freezer-safe container. For professional presentation, alternate spoonfuls of ice cream with additional cherries and chocolate pieces for visual appeal when scooped.
- Press a piece of parchment paper directly onto the surface of the ice cream to prevent freezer burn.
- Seal the container and freeze for at least 4 hours, preferably overnight, until firm.
- For the perfect scoop, let the Cherry Garcia Ice Cream sit at room temperature for 5-10 minutes before serving.
Delicious Cherry Garcia Ice Cream Variations
White Chocolate Cherry Garcia
Replace the dark chocolate with high-quality white chocolate chunks and add 1/4 teaspoon of vanilla bean paste to the base. The creamy sweetness of white chocolate creates a beautiful contrast with the cherries.
Chocolate Cherry Garcia
Transform the vanilla base into chocolate by adding 1/4 cup of Dutch-processed cocoa powder to the warm milk mixture and increasing the sugar by 2 tablespoons. The result is a decadent chocolate ice cream studded with cherries and chocolate chunks.
Roasted Cherry Garcia
Toss the pitted cherries with 1 tablespoon of balsamic vinegar and 2 tablespoons of sugar, then roast at 375°F for 20 minutes until caramelized. This concentrates the cherry flavor and adds a sophisticated complexity to the final ice cream.
Cherry Garcia Cheesecake
Add 8 ounces of softened cream cheese to the base before churning and fold in 1/2 cup of crushed graham crackers along with the cherries and chocolate. The tangy cheesecake flavor complements the cherries beautifully.
Vegan Cherry Garcia
Replace the dairy with full-fat coconut milk and coconut cream, and the eggs with 2 tablespoons of cornstarch as a thickener. Use maple syrup instead of honey and ensure your chocolate is dairy-free. The coconut undertones enhance the cherry flavor in an unexpected but delightful way.
Spiced Cherry Garcia
Add warming spices to the cream base: 1/4 teaspoon cinnamon, a pinch of cardamom, and a star anise pod (removed before churning). These winter spices make this Cherry Garcia Ice Cream perfect for holiday gatherings.
Cherry Garcia Ice Cream
Equipment
- Hand mixer or whisk
Ingredients
Ice Cream Base:
- 2 cups heavy cream
- 1 cup whole milk
- 3/4 cup granulated sugar divided
- 1/4 cup honey or maple syrup
- 5 large egg yolks
- 2 teaspoons vanilla extract
- 1/4 teaspoon almond extract optional
- 1/4 teaspoon salt
Cherry-Chocolate Mix-ins:
- 1 1/2 cups fresh cherries pitted and halved (or frozen, thawed)
- 2 tbsp cherry liqueur or kirsch optional
- 1 tbsp lemon juice
- 6 oz dark chocolate 70% cocoa, roughly chopped
- 1 tbsp coconut oil
Instructions
Macerate the Cherries
- Toss cherries with lemon juice, liqueur (if using), and 2 tbsp sugar. Let sit 30 min.
- Drain syrup and refrigerate both.
Make the Custard Base
- Heat milk, cream, and half of the sugar until steaming.
- Whisk yolks with remaining sugar and honey until pale.
- Temper yolks with hot cream, then return all to pan and cook over medium-low until thickened (5–7 min). Do not boil.
- Strain into a bowl. Stir in extracts, salt, and cherry syrup. Chill 4+ hours.
Prep the Chocolate
- Melt half the chocolate with coconut oil.
- Spread thinly on parchment, freeze 15 min, and break into flakes.
- Keep other chocolate chunked. Chill both until needed.
Churn (or No-Churn) the Ice Cream
- With ice cream maker: Churn chilled base 20–25 min. Add cherries + chocolate in last 2 min.
- Without ice cream maker: Freeze base in shallow dish, whisk every 30 min for 2–3 hours. Fold in mix-ins when semi-frozen.
Final Freeze
- Transfer to container, layering in extra cherries and chocolate.
- Press parchment onto surface. Freeze at least 4 hours or overnight.
- Let sit 5–10 min before scooping.
Notes
- Frozen cherries work fine
- Maple syrup instead of honey
- Use white chocolate or vegan dark chocolate
- White Chocolate Cherry Garcia – swap dark for white chocolate
- Chocolate Base – add 1/4 cup Dutch cocoa + 2 tbsp sugar
- Roasted Cherries – roast cherries with balsamic and sugar
- Cheesecake Version – add cream cheese and crushed grahams
- Vegan – use coconut milk, cornstarch, and maple syrup
- Spiced – add cinnamon, cardamom, and a star anise pod
Nutrition
Cherry Garcia Ice Cream FAQs
Can I use frozen cherries instead of fresh?
Absolutely! Frozen cherries actually work wonderfully in this Cherry Garcia Ice Cream recipe. Thaw them partially, drain excess liquid (saving it to add to the base for flavor), and proceed as directed. The convenience of pre-pitted frozen cherries can be a significant time-saver.
How long will homemade Cherry Garcia Ice Cream keep?
When stored properly in an airtight container with parchment paper pressed against the surface, this Cherry Garcia Ice Cream will maintain premium quality for up to 2 weeks in the freezer. After that, it remains safe to eat but may develop ice crystals that affect texture.
Can I make this recipe without eggs?
Yes! For an eggless Cherry Garcia Ice Cream, replace the egg yolks with 3 tablespoons of cornstarch or arrowroot powder. Whisk the starch with 1/4 cup of the cold milk first, then add to the heated remaining milk/cream mixture and cook until thickened.
Why did my Cherry Garcia Ice Cream become icy rather than creamy?
Ice crystals typically form when there’s too much water content or insufficient fat. Ensure you’re using full-fat dairy products, don’t skip the egg yolks (or proper substitute), and include the honey which acts as a natural stabilizer. Additionally, make sure your base is completely chilled before churning.
Can I use maraschino cherries instead of fresh?
While you can use maraschino cherries, be aware they’ll create a much sweeter, less complex Cherry Garcia Ice Cream. If using them, rinse well, reduce the sugar in the base by 2 tablespoons, and skip the additional cherry maceration step.
How can I intensify the cherry flavor?
For an amplified cherry flavor, add 1/2 teaspoon of pure cherry extract to the base or replace the vanilla extract with cherry extract. Alternatively, reduce 1 cup of tart cherry juice to 1/4 cup over low heat to create a concentrated syrup that can be added to the base.
Conclusion
There’s something truly special about watching someone take their first bite of homemade Cherry Garcia Ice Cream. Their eyes widen slightly as they realize this isn’t the commercial version they’re accustomed to—it’s something far more exceptional. When my daughter returned from college last summer, this was the first thing she requested, saying no store-bought ice cream compared anymore.
What makes this Cherry Garcia Ice Cream recipe so meaningful is how it balances nostalgic familiarity with homemade quality. The cherries burst with authentic flavor, the chocolate offers perfect resistance, and the ice cream base itself has a complexity that mass-produced versions simply can’t match.
As you make this recipe your own—perhaps adding a splash of amaretto, swapping in your favorite chocolate, or enjoying it sandwiched between homemade cookies—you’re not just creating a dessert. You’re crafting a moment, a memory, a tradition. That’s the true magic of Cherry Garcia Ice Cream made in your own kitchen, with your own hands, and shared with those you love.