

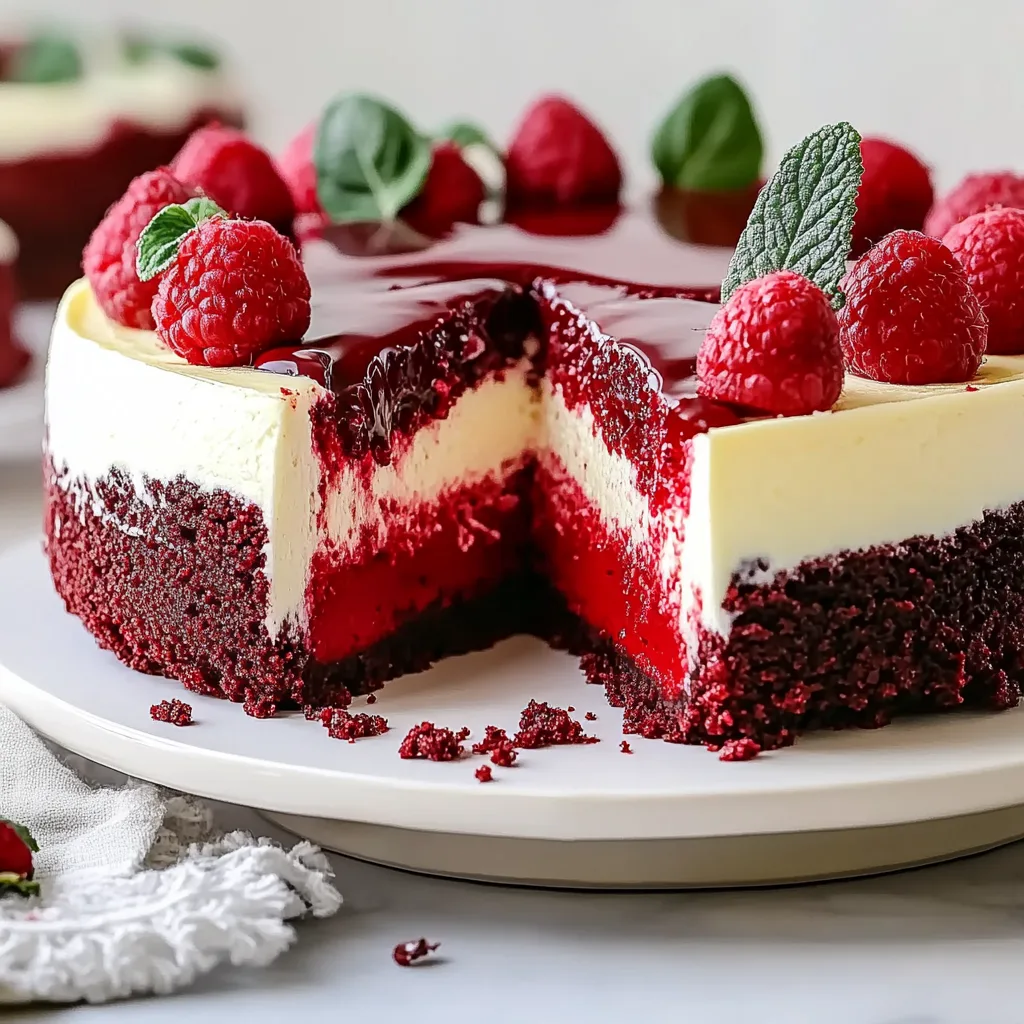
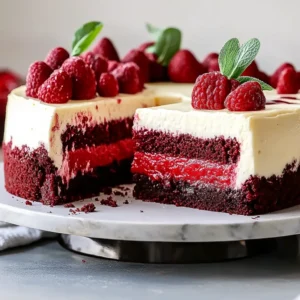
The first time I made this Red Velvet Cheesecake, the striking crimson layers against the pristine white cream cheese filling created a dessert so beautiful I almost didn’t want to cut into it—almost. One bite revealed what makes this Red Velvet Cheesecake truly extraordinary: the perfect marriage of tangy cream cheese and subtle chocolate notes, with a texture that’s somehow both light and indulgent at the same time. The velvety smoothness contrasts beautifully with the slight crunch of the chocolate cookie crust, creating a multidimensional experience that standard cheesecakes simply can’t match. As the flavors dance across your palate—the slight tanginess, the hint of cocoa, the whisper of vanilla—you’ll understand why this Red Velvet Cheesecake has become my most requested dessert for special occasions. Keep reading to discover how you can create this show-stopping dessert that combines two beloved classics into something even more magical.
Why You’ll Love This Recipe

Have you ever attempted a Red Velvet Cheesecake only to end up with a cracked surface, uneven layers, or a cake that just doesn’t capture the essence of both red velvet cake and cheesecake? This recipe solves those common frustrations with techniques that ensure success even if you’re new to cheesecake baking.
I’ll never forget bringing this Red Velvet Cheesecake to my sister’s engagement party. My brother-in-law’s mother—a professional baker for 30 years—asked for the recipe after her second slice! She was particularly impressed by how the cake maintained the distinct flavors of both red velvet and cheesecake without one overpowering the other.
What makes this Red Velvet Cheesecake particularly versatile is how easily it transforms for different occasions. Dress it up with chocolate-covered strawberries for Valentine’s Day, add crushed peppermint for a holiday twist, or serve it with fresh berries for a summer celebration. The beautiful red color makes it perfect for Christmas, Valentine’s Day, and even Fourth of July gatherings when paired with blueberries and whipped cream.
Now, let’s dive into exactly what makes this Red Velvet Cheesecake so irresistible by exploring the ingredients that create this perfect harmony of flavors and textures.
Ingredients
For the Chocolate Cookie Crust:
- 2 cups chocolate cookie crumbs: Creates the perfect foundation with a slight bitterness that balances the sweetness. Oreos with filling removed work wonderfully, but any chocolate wafer cookie will do.
- ¼ cup granulated sugar: Helps the crust hold together and adds sweetness. Can be reduced to 2 tablespoons if using sweeter cookies.
- 6 tablespoons unsalted butter, melted: Binds the crust together. Use high-quality butter for the best flavor; European-style butter adds extra richness.
- Pinch of salt: Enhances the chocolate flavor and balances sweetness. Omit if using salted butter.
For the Red Velvet Cake Layer:
- 1 ¼ cups all-purpose flour: Provides structure to the cake. For a lighter texture, substitute cake flour.
- ¾ cup granulated sugar: Adds sweetness and helps create the tender crumb. Can reduce to ⅔ cup for less sweetness.
- 1 tablespoon unsweetened cocoa powder: Gives red velvet its signature subtle chocolate flavor. Dutch-processed cocoa offers a smoother taste.
- ½ teaspoon baking soda: Helps the cake rise. Must be fresh for best results.
- ½ teaspoon salt: Enhances flavors. Use fine sea salt for the best distribution.
- ¾ cup vegetable oil: Creates moisture and tenderness. Canola oil is a neutral alternative.
- ½ cup buttermilk, room temperature: Adds tanginess and activates the baking soda. No buttermilk? Add ½ tablespoon lemon juice to regular milk and let stand 5 minutes.
- 1 large egg, room temperature: Provides structure and richness. Room temperature ensures better incorporation.
- 1 tablespoon red food coloring: Creates the signature color. Use gel food coloring for more intense color with less liquid, or substitute 2 tablespoons beet powder for a natural alternative.
- ½ teaspoon white vinegar: Reacts with baking soda for lift. Apple cider vinegar works too.
- 1 teaspoon vanilla extract: Enhances flavor. Use pure extract, not imitation, for the best taste.
For the Cheesecake Layer:
- 24 ounces (3 packages) cream cheese, room temperature: The star of the show. Philadelphia brand creates the creamiest texture, but any full-fat cream cheese works. Room temperature is essential for a smooth mixture.
- 1 cup granulated sugar: Sweetens the filling. Can reduce to ¾ cup for a more tangy flavor profile.
- 3 large eggs, room temperature: Provides structure and richness. Adding them one at a time prevents curdling.
- 1 teaspoon vanilla extract: Adds warmth and depth. Use pure extract for the best flavor.
- ¼ cup sour cream: Creates a smoother texture and subtle tang. Full-fat Greek yogurt is a good substitute.
- 2 tablespoons all-purpose flour: Helps prevent cracking. Can substitute cornstarch for a gluten-free option.
For the Cream Cheese Frosting:
- 8 ounces cream cheese, room temperature: Creates a smooth, tangy frosting. Must be full-fat and room temperature for proper consistency.
- ¼ cup unsalted butter, room temperature: Adds richness and stability. Use good quality butter.
- 2 cups powdered sugar, sifted: Sweetens and creates structure. Sifting prevents lumps.
- 1 teaspoon vanilla extract: Enhances flavor. Use clear vanilla for a whiter frosting.
- Pinch of salt: Balances sweetness. Just a small amount makes a big difference.
How to Make Red Velvet Cheesecake
Step 1: Prepare the Chocolate Cookie Crust
- Preheat your oven to 325°F (165°C). Wrap the outside of a 9-inch springform pan with a double layer of heavy-duty aluminum foil, ensuring it comes at least 2 inches up the sides. This prevents water from seeping in during the water bath baking.
- In a medium bowl, combine the chocolate cookie crumbs, sugar, and salt. Pour in the melted butter and mix until the mixture resembles wet sand. The crumbs should hold together when pressed between your fingers.
- Press the mixture firmly into the bottom and about 1 inch up the sides of the prepared springform pan. Use the bottom of a measuring cup to create an even, compact layer.
- Bake the crust for 10 minutes, then remove from the oven and let cool completely while preparing the fillings. The crust should appear slightly set but not browned.
Step 2: Make the Red Velvet Cake Layer
- Maintain the oven temperature at 325°F (165°C).
- In a medium bowl, whisk together the flour, sugar, cocoa powder, baking soda, and salt until well combined.
- In a large bowl, whisk the vegetable oil, buttermilk, egg, red food coloring, vinegar, and vanilla extract until smooth and uniform in color.
- Gradually add the dry ingredients to the wet ingredients, folding gently with a spatula until just combined. Be careful not to overmix – stop when you no longer see dry flour streaks.
- Pour the batter over the cooled crust, spreading it into an even layer.
- Bake for 20-25 minutes, or until a toothpick inserted in the center comes out with a few moist crumbs attached. The cake should be set but still moist. Let cool completely in the pan.
Step 3: Create the Cheesecake Layer
- Reduce the oven temperature to 300°F (150°C).
- In the bowl of a stand mixer fitted with the paddle attachment (or using a hand mixer), beat the cream cheese on medium-low speed until completely smooth and free of lumps, about 2 minutes. Scrape down the sides of the bowl frequently.
- Gradually add the sugar and beat until incorporated and smooth, about 2 more minutes.
- Add the eggs one at a time, beating well after each addition and scraping down the sides of the bowl. The mixture should be silky smooth.
- Beat in the vanilla extract and sour cream until just combined.
- Sprinkle the flour over the mixture and beat on low just until incorporated. Overmixing at this stage can cause cracks.
- Pour the cheesecake batter carefully over the cooled red velvet layer.
Step 4: Bake the Cheesecake
- Place the foil-wrapped springform pan in a larger roasting pan. Fill the roasting pan with enough hot water to reach halfway up the sides of the springform pan, creating a water bath.
- Carefully transfer to the oven and bake for 60-70 minutes, or until the edges are set but the center still has a slight jiggle when you gently shake the pan. The cheesecake should not be completely firm in the center.
- Turn off the oven, crack the door open slightly, and let the cheesecake cool in the oven for 1 hour. This slow cooling helps prevent cracks.
- Remove from the oven and water bath, run a thin knife around the edges to loosen, and cool completely on a wire rack.
- Cover and refrigerate for at least 6 hours, preferably overnight.
Step 5: Make the Cream Cheese Frosting and Finish
- In a stand mixer fitted with the paddle attachment, beat the cream cheese and butter until smooth and fluffy, about 3 minutes.
- Gradually add the sifted powdered sugar, mixing on low speed until incorporated.
- Beat in the vanilla extract and salt, then increase speed to medium-high and beat until light and fluffy, about 2 minutes.
- Remove the sides of the springform pan and place the cheesecake on a serving platter.
- Spread or pipe the frosting on top of the cheesecake, leaving about a ½-inch border around the edge to show the beautiful red velvet and cheesecake layers.
- Garnish with chocolate shavings, red velvet cake crumbs, or fresh berries if desired.
- Refrigerate until ready to serve. For the cleanest slices, dip a sharp knife in hot water, wipe dry, and cut. Repeat this process for each slice.
Variations
Chocolate Ganache-Topped Red Velvet Cheesecake
Replace the cream cheese frosting with a decadent chocolate ganache. Heat ¾ cup heavy cream until simmering, pour over 8 ounces of chopped semi-sweet chocolate, let sit for 2 minutes, then stir until smooth. Pour over the chilled cheesecake and let set in the refrigerator for 30 minutes.
White Chocolate Red Velvet Cheesecake
Add ½ cup of melted and cooled white chocolate to the cheesecake batter before baking. This adds a delicate sweetness that complements the red velvet beautifully. Garnish with white chocolate curls on top of the cream cheese frosting.
Mini Red Velvet Cheesecakes
Adapt this recipe to make individual servings by using a muffin tin lined with cupcake liners. Reduce the baking time to about 15-18 minutes for the red velvet layer and 20-25 minutes for the cheesecake layer. Perfect for portion control and dinner parties.
Peppermint Red Velvet Cheesecake
For a holiday twist, add ½ teaspoon peppermint extract to the cheesecake layer and sprinkle crushed candy canes on top of the cream cheese frosting. The bright red and white colors make a festive presentation for Christmas gatherings.
Raspberry Swirl Red Velvet Cheesecake
Before baking the cheesecake layer, dollop ¼ cup of raspberry preserves on top and use a knife to create beautiful swirls throughout the batter. The tartness of the raspberries cuts through the richness of the cheesecake for a balanced flavor profile.
Mocha Red Velvet Cheesecake
Add 1 tablespoon instant espresso powder to the red velvet cake batter and another teaspoon to the cheesecake layer. The coffee enhances the chocolate notes in the red velvet and adds sophistication to the flavor profile. Garnish with chocolate-covered espresso beans.
The ultimate Red Velvet Cheesecake recipe!
Equipment
- Mixing bowls
Ingredients
For the Chocolate Cookie Crust:
- 2 cups chocolate cookie crumbs
- ¼ cup granulated sugar
- 6 tbsp unsalted butter melted
- Pinch of salt
For the Red Velvet Cake Layer:
- 1 ¼ cups all-purpose flour
- ¾ cup granulated sugar
- 1 tbsp unsweetened cocoa powder
- ½ tsp baking soda
- ½ tsp salt
- ¾ cup vegetable oil
- ½ cup buttermilk room temperature
- 1 large egg room temperature
- 1 tbsp red food coloring
- ½ tsp white vinegar
- 1 tsp vanilla extract
For the Cheesecake Layer:
- 24 oz 3 packages cream cheese, room temperature
- 1 cup granulated sugar
- 3 large eggs room temperature
- 1 tsp vanilla extract
- ¼ cup sour cream
- 2 tbsp all-purpose flour
For the Cream Cheese Frosting:
- 8 oz cream cheese room temperature
- ¼ cup unsalted butter room temperature
- 2 cups powdered sugar sifted
- 1 tsp vanilla extract
- Pinch of salt
Instructions
Step 1: Prepare the Chocolate Cookie Crust
- Preheat oven to 325°F (165°C). Wrap a 9-inch springform pan with heavy-duty aluminum foil.
- Mix cookie crumbs, sugar, and salt in a bowl. Stir in melted butter.
- Press into the bottom and sides of the pan. Bake for 10 minutes. Let cool.
Step 2: Make the Red Velvet Cake Layer
- Keep oven at 325°F.
- Whisk together dry ingredients in one bowl.
- In another bowl, whisk oil, buttermilk, egg, food coloring, vinegar, and vanilla.
- Fold dry ingredients into wet ingredients until combined.
- Pour over the cooled crust and bake for 20-25 minutes. Let cool.
Step 3: Make the Cheesecake Layer
- Reduce oven to 300°F.
- Beat cream cheese until smooth. Add sugar and mix.
- Add eggs one at a time, then vanilla and sour cream.
- Sprinkle flour and mix until just combined.
- Pour over the cooled red velvet layer.
Step 4: Bake the Cheesecake
- Place the springform pan in a roasting pan.
- Fill the roasting pan with hot water (halfway up the springform pan).
- Bake for 60-70 minutes until edges are set but the center is slightly jiggly.
- Let cool in the oven for 1 hour, then on a wire rack. Refrigerate for at least 6 hours.
Step 5: Make the Cream Cheese Frosting & Finish
- Beat cream cheese and butter until smooth.
- Add powdered sugar, vanilla, and salt. Beat until fluffy.
- Spread frosting over the cheesecake, leaving a slight border.
- Garnish as desired and refrigerate until serving.
Notes
- Prevent cracks: Use a water bath and avoid overmixing.
- Best slicing technique: Dip a knife in hot water, wipe dry, and slice.
- Storage: Refrigerate for up to 5 days or freeze (without frosting) for up to 2 months.
Nutrition
Frequently Asked Questions
How do I prevent my Red Velvet Cheesecake from cracking?
The water bath is crucial for preventing cracks, as it creates a humid environment and ensures even baking. Additionally, avoid overmixing the cheesecake batter, especially after adding the eggs, as this incorporates air that can cause cracks. Finally, the slow cooling in the turned-off oven helps prevent the dramatic temperature change that often leads to cracks.
Can I make this Red Velvet Cheesecake ahead of time?
Absolutely! This cheesecake actually benefits from being made 1-2 days in advance. The flavors meld together beautifully, and the texture sets perfectly. Store it in the refrigerator, covered loosely with plastic wrap or in a cake container. Add the frosting within 24 hours of serving for the freshest presentation.
How should I store leftover Red Velvet Cheesecake?
Store leftover cheesecake in an airtight container in the refrigerator for up to 5 days. You can also freeze individual slices by wrapping them tightly in plastic wrap and then aluminum foil. Frozen cheesecake will keep for up to 2 months. Thaw overnight in the refrigerator before serving.
Can I make this Red Velvet Cheesecake gluten-free?
Yes! Substitute the all-purpose flour with a 1:1 gluten-free flour blend in both the cake and cheesecake layers. For the crust, use gluten-free chocolate cookies. The texture may be slightly different, but the flavor will be just as delicious.
Why is my Red Velvet Cheesecake not red enough?
The intensity of the red color depends on several factors. For a deeper red, use gel food coloring instead of liquid, as you can use less with more color impact. Additionally, make sure your cocoa powder is natural, not Dutch-processed, as the natural acidity helps the red color develop. If you prefer to avoid artificial coloring, beet powder works but will give a more burgundy than bright red color.
Can I use a different pan size?
Yes, but you’ll need to adjust baking times accordingly. A 10-inch springform pan will require shorter baking times, while an 8-inch pan will need longer. For a taller cheesecake, you can keep the same amounts but expect to add 10-15 minutes to the baking time. Always judge doneness by the jiggle test rather than strict timing.
Conclusion
The first time I served this Red Velvet Cheesecake at a family gathering, my aunt—who had been making traditional cheesecakes for 40 years—leaned over and whispered, “I need this recipe. This is what I’ve been trying to achieve all my life.” That moment crystallized for me how food can bridge generations and create meaningful connections.
What makes this Red Velvet Cheesecake so special isn’t just its stunning appearance or decadent taste—it’s how it honors both traditions while creating something entirely new. The classic tanginess of cheesecake and the subtle chocolate notes of red velvet don’t compete but rather complement each other in perfect harmony.
As you slice into the striking layers of your own creation, remember that baking is both science and art. The precise measurements ensure the cake will set properly, but your personal touch—whether that’s extra vanilla, a hint of almond extract, or your grandmother’s special technique for pressing in the crust—makes it uniquely yours.
I often think about how desserts like this Red Velvet Cheesecake mark our most precious moments—birthdays, anniversaries, accomplishments, or simply the joy of a Sunday dinner with loved ones. When you share this dessert, you’re not just
I LOVE IT
I absolutely love Panera Bread’s Chicken Salad! It’s the perfect blend of fresh ingredients and delicious flavors. The chicken is always tender and well-seasoned, and the combination of crisp celery, crunchy pecans, and sweet grapes creates a perfect balance of textures and tastes. The creamy dressing ties everything together beautifully without being too heavy.
Whether I have it on a sandwich, with a side salad, or just by itself, it never disappoints. It’s a great option for a light yet satisfying meal. I highly recommend it to anyone looking for a refreshing and tasty chicken salad.